How to use the tint preview
The preview has three sets of controls — windows, presets and fine tuning — so the first screen can look like a lot. For most people two preset taps are the whole job. Everything else exists for when those two are not enough.
Getting the picture you want in three minutes
There are only three steps: car → paint → film.
- Pick the model — tap 1 Model in the step bar under the photo (1 Model · 2 Colour · 3 Film · 4 Save). On a wide screen the same four steps run down the left side. Finished steps get a ✓, and the value you chose sits under each step, so the bar alone tells you the current setup.
- Pick the paint colour — 2 Paint colour. The same shade reads very differently on a white car and a black one, so it is worth setting this to your actual car.
- Tap two presets. The 3 Film card has two rows: darkness (how dark) on top and finish (colour and reflection) below. The rows do not overwrite each other, so you can mix freely — Typical install plus Blue satin, for example.
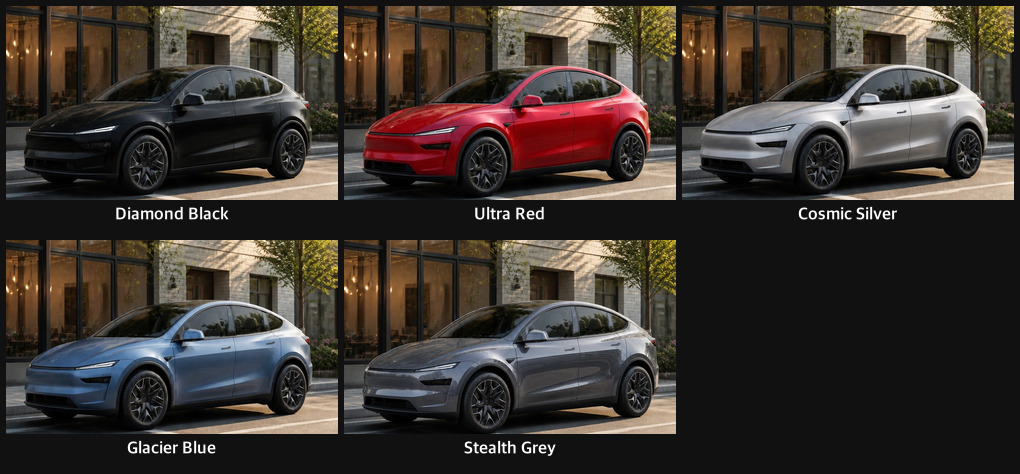
That is the basic flow. The large photo and the two smaller ones all update together, so a combination that looks fine from one angle can be checked against the others straight away. Tap a small photo to bring that angle up to the large one. Tap the large photo once to zoom in on that spot, then drag to move around while zoomed — useful for checking a glass edge or a reflection up close. Tap again to zoom out. To clear all the film and start over, pull the photo down on a phone (like a refresh); on a wide screen use Reset film below the presets.
What the four windows are
Film is applied glass by glass, and the legal limits differ by glass, so the screen is split the same way.
- Windshield — the highest legal limit in South Korea: 70% VLT or more.
- Front sides — driver and passenger windows. Also limited: 40% or more.
- Rear sides — the back-seat windows. No legal limit.
- Rear glass — also no legal limit.
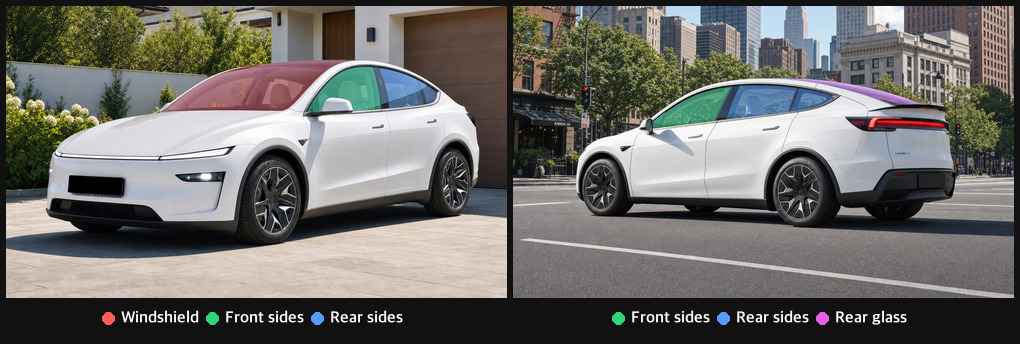
Choosing All windows in the window tabs changes all four at once. To adjust one piece of glass, select it first. Each tab also shows what is currently applied to it.
The glass roof follows the windshield. This car's roof is glass too. Rather than adding a fifth control, it is tied to the windshield — so darkening the windshield darkens the roof as well. That is deliberate, not a glitch. Whether to film the roof at all is a separate decision; ask your installer about it directly.
What the three axes mean
When the presets are not enough, opening fine tuning reveals three rows. The names sound similar but they set genuinely different things.
- Darkness — how dark it is. The number is visible light transmission (VLT), and lower is darker. 70% is nearly clear; 5% is nearly opaque. This is the axis that decides how much of the interior shows.
- Hue — the colour of the light coming through the glass. It is what you see looking out from inside, and the cast on the interior when looking in. Charcoal, neutral, blue, green, bronze, purple.
- Reflectivity — how much the surface mirrors its surroundings. Non-reflective → standard → satin → mirror, in increasing strength. The stronger it is, the more the glass shows the scene outside instead of the interior.
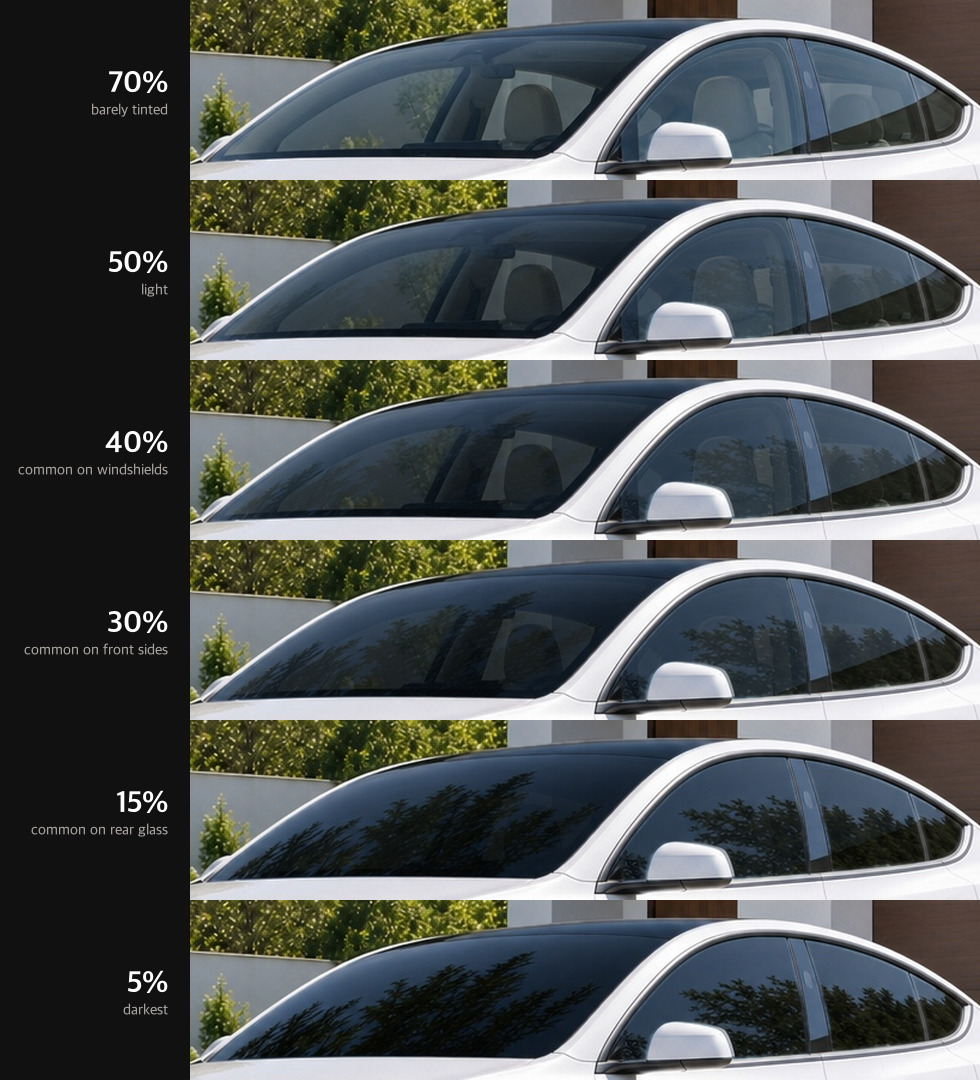
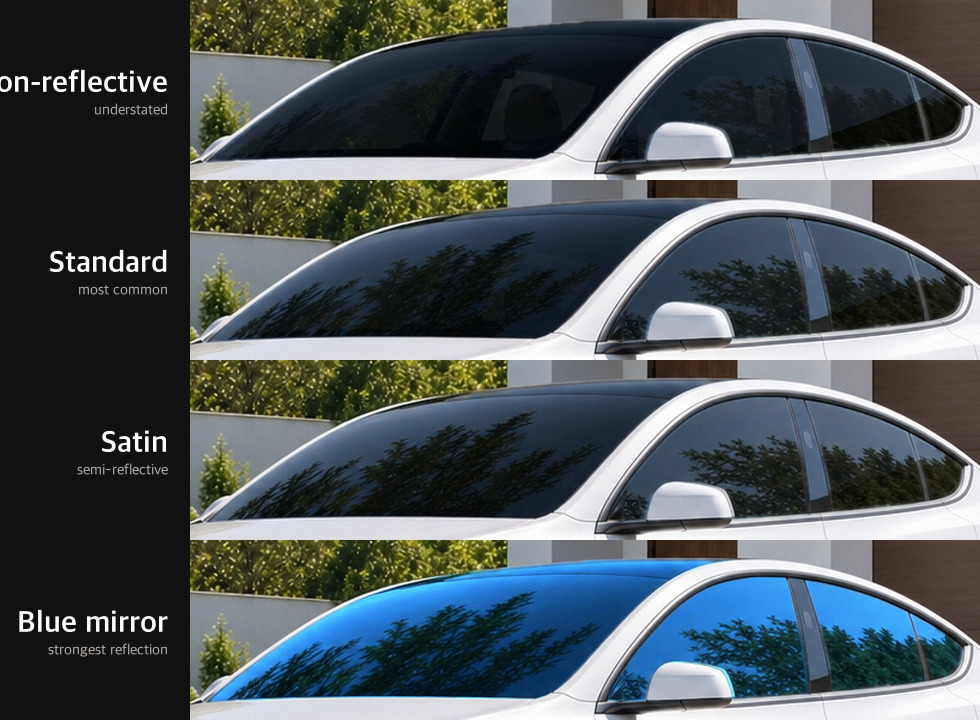
Hue and reflectivity are easy to confuse. Think of it this way: hue is the colour that passed through the glass; reflectivity is the colour that bounced off it. There is a fuller explanation in hue vs. reflectivity.
On a phone the 3 Film step shows presets, windows and fine tuning all at once; the photo stays put and only the control panel scrolls. Tap the step bar under the photo to move to another step.
What the screen can and cannot show
This preview renders the same car, same angle, same light with only your settings changed. Installation photos from different shops can't be compared with each other — the car, the angle and the lighting all differ — and removing that problem is what this screen is for. There are still things it cannot reproduce, and they are worth knowing.
- The stated shade is not the measured one. Factory glass already blocks some light. 70% film on 80% factory glass measures roughly 56% in total. The number on screen is the film's own figure.
- Weather and time of day are not in it. The same film looks different in direct midday sun, under cloud, and in a parking garage. The screen shows one lighting state.
- The car's own paint reflecting in the glass is not reproduced — the red cast you get in the windows of a red car, for instance. What reflects in the glass comes from the surroundings in the photo.
- No single product is being shown. The hues and finishes represent families. Two films both called "blue satin" will differ between brands.
So the decision is best finished at the shop, against real samples. Use this screen to narrow the field and to work out what to ask — the pre-install checklist collects those questions.
Saving and sharing
There are two ways to keep what you set up, and they are good for different things.
- Save image — turns the large photo into a file, with a summary of your settings and a QR code along the bottom. Best for showing an installer: one picture is more precise than saying "15% in blue satin".
- Share — passes along a link that carries your settings. Whoever opens it starts where you left off and can adjust it themselves. Better for talking it over with family.
Because the settings live in the address, you can also just bookmark it — reopening restores the same state.
See it yourself — tint preview →
More guides
- How to choose a tint shade (VLT)
What 70, 50, 40, 30, 15 and 5 percent actually look like — and why the same film looks different in every photo.
- Tint VLT comparison: 70% to 5%
What each level looks like from outside and from inside, in one table — and why the numbers differ between countries.
- Korean window tint law, explained
Where the 70% windshield and 40% front-side limits come from, how they are measured, and which windows are unregulated.
- Hue vs. reflectivity
Charcoal, neutral, green, blue, bronze — and why colour and mirror finish tend to arrive together.
- Mirror tint: how it looks and whether it's legal
How reflective film works, what it actually looks like, and the legal points to check before you book.
- Before you book: a checklist
How to decide the per-window combination, and what to ask the installer.
- Tesla Model Y: window-by-window
Large glass area, an all-glass roof, heat-formed curves — what to watch for on a Model Y.